Setting Up Emails And Secure Connect with 2FA in Bitwarden
Emails: (For Secure Connect instructions, see page 4)
Log into the Google account
Log into Bitwarden - The VAULT, not the extension https://vault.bitwarden.com/
Navigate to the item you want to add 2FA and click ‘edit’ to open it up
Move Bitwarden to your other monitor so you have both screens available
On your Google screen, click on the account icon at the top right of the window
Click on the ‘Manage Your Google Account’ button.
Click on ‘security’ from the left ribbon
Click on the 2-Step Verification link in the “how you sign into Google” section
In the next section, click the Blue ‘Turn on 2-Step Verification’ button (you MAY need to click the Authenticator app button and set that up first)
You will see a ‘You’re Protected with 2-step Verification’ screen. Click ‘done’
In this screen, click the row with ‘Authenticator - Add authenticator app’
In the next screen, click the ‘+ Set Up Authenticator’ button
You will see this screen next:
Please click the ‘Can’t scan it?’ link and then click ‘next’

The next screen will provide you with an authenticator key (outlined in step 2)
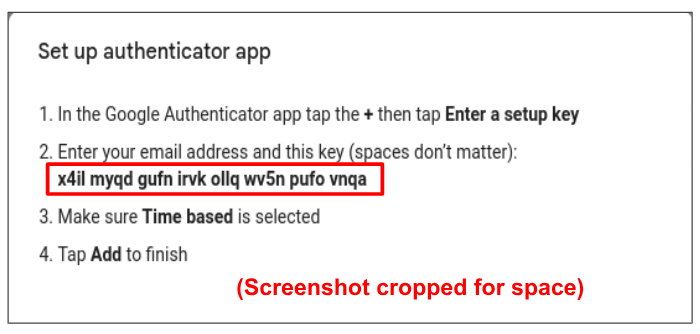
Manually copy the “Authenticator Key”
Keep the website open - don’t close the tab
On your other monitor, paste the “Authenticator Key” in the correct field in Bitwarden

Click ‘save’ and keep Bitwarden open.
Go back to the other screen and click ‘next’ - it will likely ask you to enter in the code generated by the OTP (Bitwarden) to verify

Go back to the Bitwarden window, open the item, copy the newly generated code
Paste the code into the appropriate place and click save (if asked)
Click the ‘Turn on 2-step Verification’ button
Moving forward, you can use the extension to copy the code (see picture below) OR automatically enter it by clicking on the item name.
NOTE: if you try to log in and it keeps
telling you that you need to send a code
to the previous person (former employee):
Submit a ticket to the helpdesk
Agent:
Log into the Admin account
Open that email account from the Users
part of the Admin, module
Click on the name, in the next screen
click the ‘security’ tab at the top
Scroll down to ‘Login Challenge’ and
Press the ‘turn OFF for 10 mins’ button (clock icon)
For Secure Connect Setup:
Log into the practice account in Secure Connect (https://ACRO.pcc.com/secureconnect).
The first time you sign in, you will be prompted to scan the barcode to complete the enrollment process. DO NOT SCAN THE BARCODE
Instead, click the link below:
In this section, make a note of the Secret Key. You will need to add this to Bitwarden

In Bitwarden, open the Browser Extension, or the Vault - whichever you prefer
For the Extension:
click the plus symbol at the top right, next to your initials
Fill in the appropriate information
Scroll down and choose ‘personal’ in the ‘folder’ dropdown
Scroll down further and choose ‘individual’ in the Collections section
Save
For the Vault:
Open your individual folder.
Click the blue ‘new item’ button in the middle of the screen.
Create the new item, and add the Secret Key info in the Authenticator field.
Scroll down and choose your individual collection to save the item in.
Save
PLEASE BE SURE TO LOG OUT OF ANY PCC PROGRAMS PRIOR TO CLOSING SECURE CONNECT
Was this article helpful?
That’s Great!
Thank you for your feedback
Sorry! We couldn't be helpful
Thank you for your feedback
Feedback sent
We appreciate your effort and will try to fix the article